Welcome!

Thanks for calling by. I hope you enjoy what you see, feel free to leave a comment and call again to catch up on my news.

Thursday 22 December 2011

Merry Christmas everyone!

I'm sorry I've not been on here for a while. I spent a week in London visiting my son and daughter and since I got back my feet have barely touched the ground as there was real-life Christmas to organise.

These photos are from last year, showing Willow trying to decide whether he could reach the baubles. Of course he could! Nothing is safe from a cat! This year we don't have snow so no white Christmas this time around.


I'll be back in the new year with a give-away to celebrate my 50th follower, and news of the quilts I'm going to sell on Etsy, but in the meantime ...

... thank you for continuing to visit my blog, thank you for all your support and your lovely comments, and I hope that each and every one of you have a wonderful Christmas with those you love.

Tuesday 29 November 2011

A stitching frenzy

At least, that's what this looks like. Actually I've been working on these over a couple of months - just not told you about them before. So this is what I've been doing in between working on the manor house ...


I've had this old wooden box for years and never done anything with it. There is a lift out tray inside which my daughter uses to keep her jewellery in when she comes to visit, but it wasn't ideal really. So I decided to line the box with some leftover fabric from a pair of silk curtains.


And I stitched this piece of needle lace onto the padded piece that sits inside the box lid. Now it looks like a casket fit for jewels.


I've been wanting to try decorative darning for quite a while now and I finally got around to making this sampler.


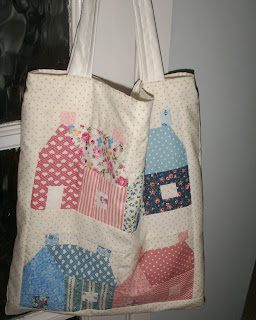
I made a patchwork bag to hold all my miniature knitting and sewing yarns and needles, etc. I thought the little houses pattern was ideal for holding things for my dolls houses.

Inspired by a beautiful sunny October morning where the sunlight turned the falling leaves to gold, I made this autumn leaves picture in needle lace and goldwork.


And we had a workshop at our local Embroiderers Guild learning how to do stumpwork (raised surface embroidery) and I made this figure. The skirt is needle lace, the jacket a piece of textured silk fabric, the scarf a tiny snippet of georgette and the boots and handbag are real leather - inspired by my beautiful daughter.


I've also been busy finishing off some miniature quilts which I'm planning to sell on Etsy, but I'll show you those another day, when I get that organised.


Sunday 27 November 2011

Additions to some of the rooms

I've been adding some of the accessories that I've bought recently for the manor house so some of the rooms are finally beginning to feel a little more homely and ready for a family to move in.

The dining room now has a table with four chairs and a display cabinet in the corner. There's nothing in the cabinet yet but there is a vase of flowers in the centre of the dining table.


There are some pans on the kitchen stove, some dishes on the sink draining board and more on the worktop and on the dresser, together with some jelly moulds and a jug. A kettle sits on the kitchen table along with a glass bowl, waiting to be filled.


The front door has a letter box, door knob and keyhole and a house sign.


The settees in the sitting room are now covered and there are a couple of letters on the writing desk.

And this is the dressing table in the bedroom, complete with perfume bottles, hairbrush, combs and mirror on a second silver tray and a vase of rosebuds.

There is still lots more to do and lots more to make but progress is happening - slowly but surely.

When I went to Pudsey miniatures Fair earlier this month my main aim was to find a bathroom suite. I did buy one and at the time I felt it was a little large but the woman on the stall assured me that it was 1/24th scale. She was wrong; I was right; it isn't. It's also not 1/12th scale. So I made a tiny roombox just to fit the bathroom suite.

I have pictures, towels and a bath mat to add to this yet but at least the bathroom suite isn't wasted. In the meantime, the search goes on.

Friday 11 November 2011

Furniture and dipping a toe in 1/4 scale

First of all I want to say a huge welcome to all my new followers! Thank you for taking the time to stop by and look at my minis. I really appreciate your interest and your comments. I'm also thinking that maybe it's time I started to think about a giveaway for when I reach 50 followers - almost there!

It's been a pretty busy week this week on the minis front. I've been making lots of furniture for the manor house. If I'm going to paint the furniture that I make in 1/2 scale then I use mount board as I find it more stable and much easier to work with than very thin wood.

I made a toy box and a single bed for the children's room. The bed is made from two pieces of foam board stuck on top of each other with pieces of mount board stuck around the edges to make the divan base. The mattress is a piece of polystyrene covered in a used tumble drier fabric softener sheet and the top sheet is another piece of the fabric softener. Not only is this really soft and easily draped, but it also smells good. The bed head is mountboard again with a border of cereal packet card.


I also made an armchair for the study. As you can see from the photos below, the seat is again two pieces of foam board stuck together. I didn't have a pattern for the winged back - just guess work and trial and error and made from cereal packet. I stuck a bit of thin wadding on to the top part of the back and then covered it with imitation suede fabric, turning the edges over on to the back and then covered the raw edges with another piece of cereal packet cut slightly smaller than the back and also covered in the suede effect fabric.


I don't know whether you remember but the sitting room has green wall paper so the red velvet on this little bought settee didn't really look right so I've decided to re-cover it in this gold silk fabric. I prised off all the red fabric with the tip of my craft knife and will use the pieces as patterns to cut the silk material.


I'm also making a knoll settee for this room. Again, no pattern. The seat is yet again two pieces of foam board stuck together and I then used this for the measurements to make the back and side panels. I scored them just a fraction above the top of the seat so there is room to put cushions on the seat, and then stuck wadding onto the back and sides. This is also destined to be covered in gold silk.


It was our miniatures group meeting on Tuesday evening and a clever lady who always works in quarter scale or smaller taught the workshop. We made a quarter scale Tudor shop. It's the first time I've ever ventured into this scale but I have to say that I loved making it. I don't think I shall be doing more on such a small scale but we had a lot of fun and I'm quite pleased with the results. I shall be looking out for furniture and bits and pieces to fill it on Saturday at the Pudsey Miniatures Fair.


Saturday 5 November 2011

Racing towards the finish line

I'm sorry I've not posted for a while. I have been busy on the Georgian house, but there really hasn't seemed to be much to show for the work. It's a matter of catching up on all the bitty jobs that make it possible to fit it all together... odd bits of painting and the like. So here are the fruits of all that labour.


The fronts are painted on the outside. Gosh those quoins were tricky to do but I'm quite pleased with the result. The doors onto the balcony still need work but I couldn't resist putting the letterbox onto the front door.


The roof tiles are painted. I've splodged a little white paint on the back of where the dormer windows will fit. I'm planning to put blinds or curtains at the windows before I glue them in place so that it looks a little more realistic at least.


Here are those dormers ... all painted.


The porch and balcony are painted and glued together but I need to finish those balcony doors before I fix them in place.


The bathroom is decorated and I fixed a light to the back wall. The ceiling is far too low to have a light hanging in the normal manner so I thought this would be an acceptable compromise. I'm going to the Pudsey Miniatures Fair next weekend so am hoping to find a nice 24th scale bathroom suite to go in here.


The children's room is decorated, complete with safety rail around the top of the staircase. There is a lamp up against the back wall which will eventually sit on a bedside cabinet when I've made one. In this picture you can also just about see that I added curtains to the bed downstairs and a tiny lace motif on the silk coverlet. When the house is complete I'll go through each room in turn and show you photos of everything in there so better pictures will come in due course. 


This is the carpet I made for the children to play on.


I put lots of pictures on the walls in the study


The light fitting looks a little crooked. I must have caught it with my hand when I was fixing those paintings in place.

There are more portraits in the hall


and yet more pictures in the sitting room.


You get a better view of the cameos on the back wall here too.
Lots of furniture still to make and the inside of the front of the house to decorate but, after working on this for the past ten months, I do feel that it's finally coming together.

Thursday 27 October 2011

The top floor is decorated

... well, there is wallpaper on the walls at least. I've decided that the smaller portion of this top floor is going to be a bathroom so have chosen some pale blue tiled paper for the walls in there.


I have a darker blue version of the same paper which I'm planning to put on the floor. The roof slopes down towards the front to accommodate the dormer windows so the doorway is quite close to the back wall but there is plenty of space to fit a bathroom suite in here. I already made a chest of drawers which I don't think will be staying in that back corner.

The larger portion of this level is going to be the children's room - bedroom and playroom combined. The paper on the back wall is the same blue with little birds printed on it and the side walls have a striped paper - just to break up the blue a little as I'm intending to have a baby boy and a somewhat older girl.


I made a cot from a kit bought from Petite Properties and a bookcase (you can see a few books strewn on the floor already. I've also made railings to go around the stairwell to prevent the children from having a major accident. The stain is drying on these at the moment, which is why they're propped up like that.

I also made a desk for the study ...

... this is awaiting a coat of varnish and some drawer handles.


Meanwhile, I've also been making progress on the little Halloween scene.


There is a basket of toadstools ...


... a pile of pumpkins, a broomstick ...


... a spell preparation table (not quite finished yet as the cauldron needs to have something brewing and the table needs more ingredients) ...


... and a dresser filled with books, potions, scrolls and a carved pumpkin.

We're not there yet but it is starting to come together.

Tuesday 18 October 2011

Progress is slow ...

... but it is progress. The windows in my real life house are in, Willow is home from the cattery where I sent him last Wednesday when I realised that I really couldn't keep him safe at home after all. For once I think he actually agreed with me as he went quietly and it was only for three days.

Now here's the progress - the manor house is built up to the top floor.


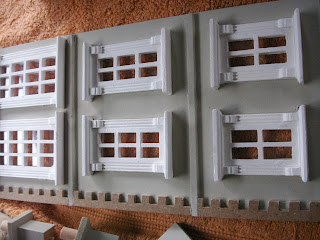
 I also painted the outside front walls - goodness this took hours to do!! so tricky around the windows. If I'd had my choice the walls would have been painted before the windows were put in place but they were already fixed when I bought the kit.


I also painted the chimney pots and the porch base and roof. The quoins on the side of the front wall are going to be painted white.


Each year, the miniature group I'm a member of has a winter competition, and this year the title is 'an annual event'. We were given a wooden board which measures 8" x 6" on which to make our scene. The board is actually the back of the picture frames which framed last year's competition box - hence the holes in the centre.


I don't normally 'do' Halloween but I just felt like doing a witchy scene for a change so I built two walls and covered them with a mix of filler, pva glue and grey paint, which I applied quite roughly.


The floor is cereal carton cut up into squares and rectangles measuring a mixture of 1" and 1/2" wide and then glued down.


I made a table, which I painted with red acrylic, varnished it with clear nail varnish and then used that black crackle nail varnish on top. I think it looks suitably spooky.


The dresser is made of mount board and is just very roughly painted with a dark olive green and then smeared and crackled with black over the top.